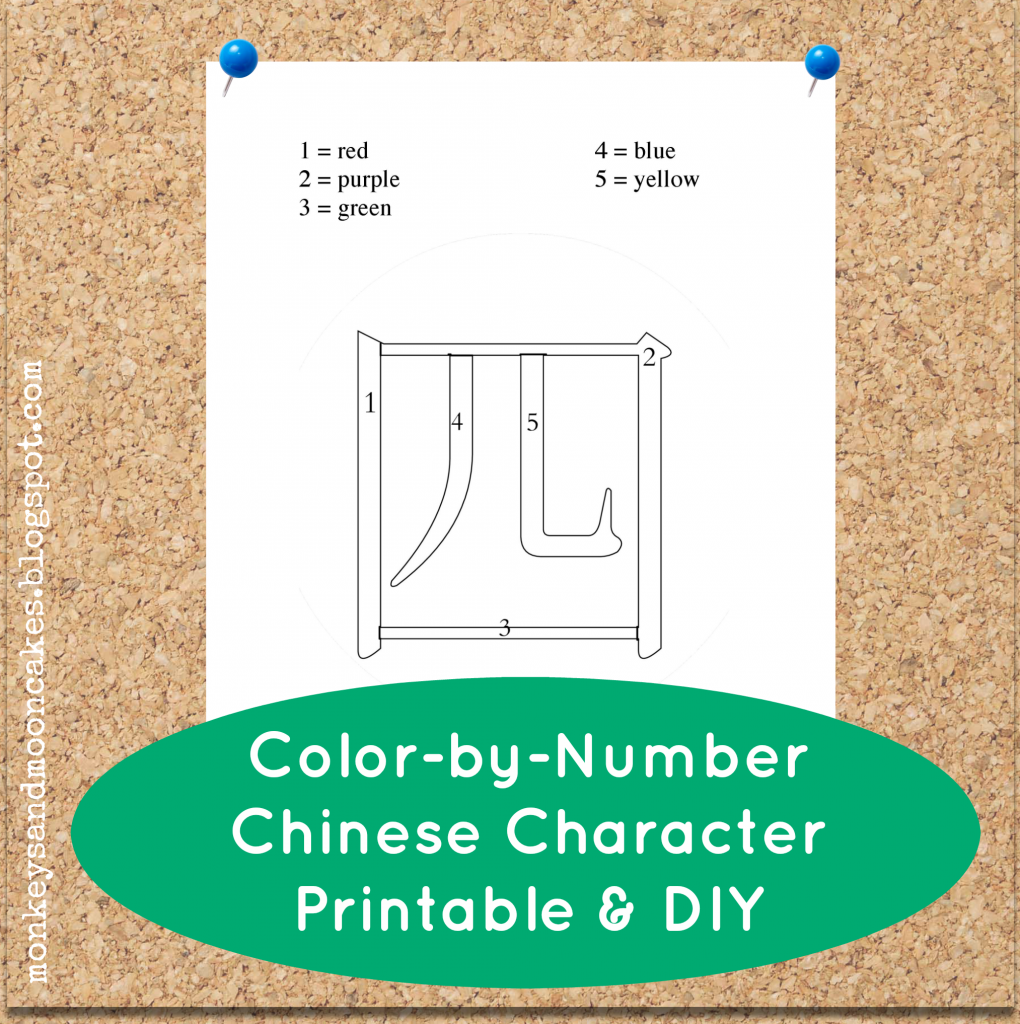
Image Map
Showing posts with label DIY. Show all posts

Wednesday, September 30, 2015

Learning Mandarin with Dry Erase Tape Magnets: DIY

Happy (a few days late) Mid-Autumn Festival! 中秋节快乐!Zhōngqiū jié kuàilè!

Did you see the Supermoon eclipse? I hope so! Unfortunately, we were clouded over and did not see one bit of that beautiful moon. No moon cakes for us either (my kids refuse to eat them). 

But we did learn how to write "moon" (月亮, yuèliàng) and say:

"Mid-Autumn Festival is on Sunday"  
中秋节是星期天。Zhōngqiū jié shì xīngqítiān.

                                                             &

"Mid-Autumn Festival is September 27." 
中秋节是九月二十七号。Zhōngqiūjié shì jiǔyuè èrshíqīhào.

I noticed that my daughter and her friend were struggling a little with sentence order as they translated these English sentences into Mandarin. I remember going through this as a beginning Mandarin student -- knowing which words to say but struggling with putting them together in the right order in Mandarin. 

Then, yesterday I saw dry erase tape at our local hardware store and thought, "How cool is that! What project could I make to justify buying that super cool office supply?"  

A few hours later, Eureka! I was making dry erase magnets on which I wrote Mandarin phrases and words that the girls could then rearrange to make sentence construction just a little easier. 

*******************************************************

Here's the DIY:


Materials
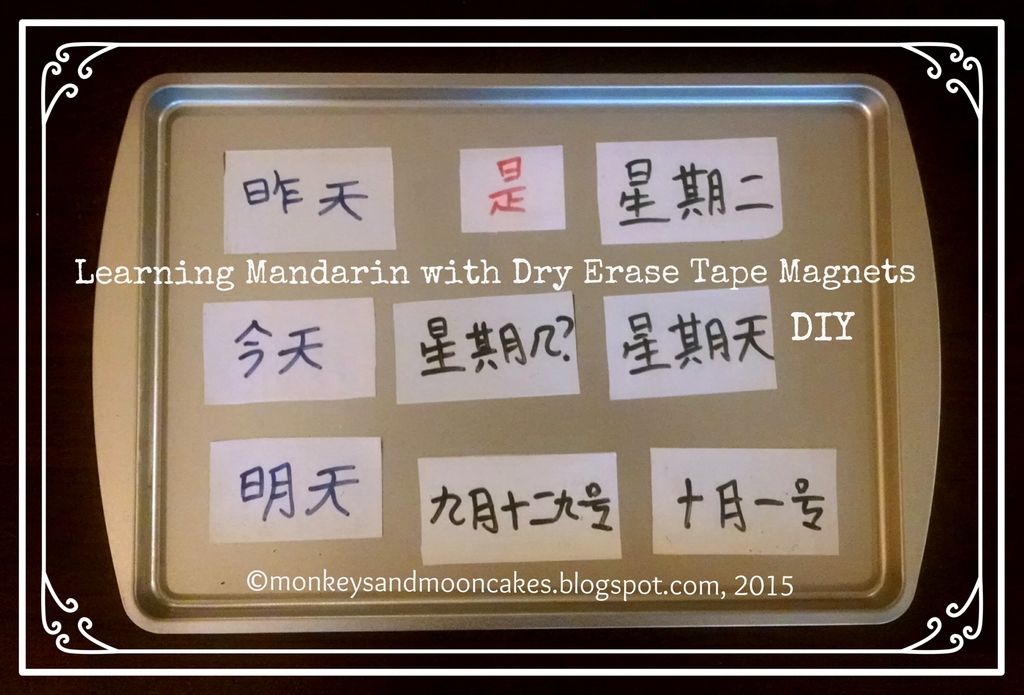
  • Scotch Dry Erase Tape
  • magnets (I used the many freebies we receive in the mail from doctors, dentists, etc...)
  • cookie sheet (I bought mine at the Dollar Store)
  • dry erase markers

Steps  This is so easy peasy. Just 3 simple steps.
  1. Stick dry erase tape onto magnets. It removes very easily as well.
  2. Cut to size. The cheapo freebie magnets are thin and easy to trim down.
  3. Write your Mandarin words and phrases on the magnets with dry erase markers and stick them to the pan.  And done!

Now,here's how we used the magnets 
  • I spoke sentences in Mandarin which the girls, then, had to piece together using magnets on the cookie tray.
  • I built a question out of magnets on the tray, and they had to answer it by swapping out the question word/phrase (i.e. 星期几? Xīngqí jǐ 几月几号? Jǐyuè jǐhào) for the correct answer magnet or by writing the answer on a blank magnet. 
  • I asked a question out loud that the girls then had to answer by: 1st--forming their answer with magnets on the tray, 2nd--reading their Mandarin sentence out loud, and 3rd--translating the sentence into English.
  • I used the magnets to form a sentence that had an error (i.e. Mid-Autumn Festival is on Friday. 中秋节是星期五。Zhōngqiū jié shì xīngqíwǔ), and then asked them to correct the error. 
So that's what we did in a nutshell. I'm excited to explore other ways we can use this learning tool in our Mandarin lessons. 

If you make dry erase magnets for your Mandarin learning, leave a comment below. I'd love to know how you used them!

post signature

Friday, November 14, 2014

Color-by-number Chinese Characters: Free Printable & DIY


Earlier this fall, I searched for some pre-writing activities that could reinforce the Chinese characters I was introducing in an after school class I was teaching at my kids' school.

When I couldn't find exactly what I was looking for, I adapted an old standard: 


I discovered that the color-by-number idea works pretty well with beginning Chinese characters. And even better: it was accessible to the little ones in my class who were just getting used to writing with a pencil.

Click here to download the snazzy color-by-number printable above. I've numbered each stroke of the character (4, sì), so each stroke should end up a different beautiful color.


*****************************************************************************


If you want to make your own color-by-number Chinese character, here are 2 ways you can do this:


The first way is what I call the Easy Peasy Draw Your Own method.It's just as it sounds: Hand-draw your own color-by-number character. This is doable, even if you are just beginning to learn Mandarin. 

  1. Go to the dictionary at yellowbridge.com. You can input your word in English, Chinese characters, or pinyin. Then, after you've found the character you're looking for, click on "stroke order" to see how to write the character. 
  2. Write the character in outline form. 
  3. Section off the strokes, and number the sections.
  4. Write in your number/color designations (i.e. 1=yellow).
And Done!


************************************************************************


If you want a little more technical finesse in your final product...Turn it into WordArt!


1.  Using your Chinese input on your computer, type your character in a new Word document. 

-->If you do not have Chinese input, you can type the pinyin into Google Translate, copy the Chinese character from Google Translate, and paste it into a Word document.

-->If you want to get fancy, choose a different Mandarin font for the characters. I used Hannotate TC Regular because it looks like handwriting.

2.  Highlight the character you just typed or pasted in the Word document. Select "WordArt" under the Insert menu. You should now see the Chinese character that you typed in outline form.

-->This may look different on your computer depending on if you're using Mac/Windows and how recent your operating system is. Check out this link from Microsoft support to walk you through inserting WordArt in a Word document.

3.  Adjust the style of your WordArt according to your preferences in the WordArt/Formatting toolbar. Again, the location of this toolbar will be different depending on your computer. Refer to the Microsoft Support page if you get stuck. 

4. Adjust the size of the new WordArt according to your preferences. I resized mine to 400 pt. You may have to expand the size of the text box to accommodate the bigger size. 

5.  Now you have a choice to A. save, print, and then hand draw all the little dividing lines in to make it a color-by-number, or B. save as a PDF and upload to PicMonkey where you can do this on your computer.

-->If you choose Option A, well done! Enjoy your new, snazzy Chinese character outline.

-->If you choose Option B, very nice! Please read on for further instructions. 

6. The next step is to convert your PDF to jpg. There are lots of free PDF to jpg converters online. I'm not an expert here, but take a look. 

7. Once you have converted and saved the WordArt character you created as a jpg, go to Picmonkey.com, choose "edit" and upload the jpg. 

-->If you're not familiar with PicMonkey, it's awesome!!! It's a online photo editing tool. I use their free tools, but you can also pay a fee to access more tools (they're not paying me for this promo--I just really love the website=)

8. After you have uploaded your jpg, choose the tool on the left side of your screen that looks like a tube of lipstick and scroll down the list of tools until you see "draw"(under "Artsy").

9. Adjust the brush size and color according to preference, and then draw in any dividing lines (to separate strokes).
10. Next, click on "T" (for add text) and click on the "add text" button. When the text box appears, choose a font and type in the numbers that will dictate which color to use when your little ones color in. Position and resize as you see fit.

-->You will have to add a new text box for each number. 

10. Once you are finished, save to your computer.
And Done! You now have a nifty color-by-number Chinese character image that you can use in any document, using "insert picture." 


What pre-writing activities do you use in your home to teach Mandarin?

post signature

Sunday, September 7, 2014

Mid-Autumn Festival Moon Craft DIY

Mid-Autumn Festival (中秋节, Zhōngqiū jié) is tomorrow--Monday, Sept. 8th!  

We like to celebrate this Chinese holiday by reading stories about Chang E and Hou Yi (The kids like the version in Moonbeams, Dumplings, & Dragon Boats best=), nibbling on mooncakes or mooncake cookies, and staying up a little later than usual to gaze at the moon.

This year, I shared about the holiday with Monkey #1's 4th grade class. They listened to a story, nibbled on moon cakes, and learned how to write the character for "moon" (月,yuè).
Click here to download this printable. 

Before sharing with her class, I scoured Pinterest and Google, looking for creative ways for the kids to practice writing this character. 

The criteria were: 
  • must be simple (5 or fewer steps; 5 or fewer minutes to complete)
  • must use few materials and not be messy 
  • and most important of all--must be interesting enough to a 4th grader that it will help them remember how to write the character and what it means. 
And...with 60 minutes left on the clock...this is what I came up with:

Materials: 
tracing paper
bright card stock or construction paper
magic tape
big sharpie
scissors
star stickers (optional)
Step 1
:  
Cut a piece of tracing paper in half or quarters (depending on how large you would like your "window"). My tracing paper was 8X11 so I cut it in quarters to get the most "bang for my buck."

Step 2: 
With a thick sharpie, write the Chinese character for moon on it (see above printable for instructions). It can be as large or small as you want.


Step 3:
Cut a brightly-colored piece of construction paper or card stock to the same size as your tracing paper. 

Step 4: 
Tape the tracing paper to the top of the card stock, using a piece of magic tape.

Step 5:
Noting the location of the character, draw a moon with a sharpie on the colored card stock. Your moon can appear behind the entire character (like the one below, left), or just appear in the top half of the character, as if seen through a window (below, right). 
And done!


Simple?  Yes!
Easy to remember?  Yes!
Fun for a 4th grader? Let's just say, the neon paper helped=)


Wishing you a very Happy Mid-Autumn Festival! 中秋节快乐!

post signature